Many people believe that they can listen to music right after installing a new amplifier in their vehicle.
But that’s not entirely true since there’s one more step: tuning the amplifier.
In this post, we’ll discuss how you can tune the amplifier settings for mid and high-level frequencies.
Mids, Highs, and Lows
Humans can hear sounds between the 20-20,000Hz frequency range. This range is divided into three major sections:
Highs:
Also known as Treble, this section refers to the highest frequency notes humans can hear – from 4000Hz to 20,000Hz. Treble is used to bring detail and clarity to the sound.
Lows:
Also known as Bass, Low-level frequencies are the exact opposite of the Highs. All frequencies below the 200Hz mark belong to this region. These frequencies are harder to produce than the other types. This is why we use specialized speakers for such frequencies – subwoofers.
A higher bass is preferred in some music genres such as rock, metal, and reggae.
Mids:
In between Highs and Lows, there’s the Mid region. It ranges from 400Hz to 4000Hz and determines the prominence of music instruments in a soundtrack. Vocals also fall in the midrange region.
How To Tune A Car Amp For Mids And Highs
1. How to Set Amplifier Gain
The first thing we’ll adjust here is amplifier gain.
Most beginners treat the amp gain as the volume knob on the head unit and turn it all the way up. In reality, it’s the ratio of the output voltage to the input voltage. In simple words, the gain is the ability of the amplifier to amplify an input signal.
Below we’ll discuss two different ways to adjust gain in your car amplifier
How to Set Amp Gain with Multimeter
First of all, turn up the head unit volume at 75% of its max level. Next, go to the EQ settings and turn off no bass/treble/mid boost in turn on. In other words, make sure these settings are at factory level so you can get a flat, vanilla sound.
Now, you’ll need to find the voltage of your amplifier using this formula: V = √(PxR) where P is power and R is resistance.
So if our amp is capable of providing 125 W power at 4 Ohm, the voltage will be: √(125×4) = √500 = 22.36V.
Now, take a digital multimeter, set it to AC voltage, and connect its positive and negative wires to speaker-level outputs. This will give you the voltage number for the amplifier. Then, adjust the gain knob until the number on the multimeter matches the one you found during the above calculation (22.36V).
How to Set Amp Gain with a Distortion Detector or Oscilloscope
The above method of finding correct gain is pretty reliable in most cases but has a few problems.
The first one is that by setting the volume at 75% initially, we kinda assumed that there’ll be no distortion at this level. In reality, however, most factory stereos start to give distorted sound as soon as you move past the halfway mark.
We also made a similar assumption with the amplifier that there’ll be no distortion at max output. While it’s certainly true for big audio brands, many cheap manufacturers don’t usually pass this test.
Therefore, it’s better to put the guesswork out of the equation and use a purpose-built tool: a distortion detector. Using this device is similar to how we used a multimeter above.
First of all, turn down the gain knob completely. Then connect the distortion detector’s terminals to speaker outputs. Now, turn up the volume of the head unit and continue to do so until the ‘Distortion’ LED on the detectors turns on.
As soon as it turns on, lower the volume knob slightly until it turns off again and note down this level. This should be the upper limit of the volume from now on.
Similarly, adjust the gain knob until you see the Distortion LED turn on. Once it turns on, lower the gain level a bit. This will be the correct gain for your amplifier
2. How to Set High-Pass Filter
Since we’re optimizing our amplifier for the mids and highs, the next thing we’ll do is tune the high-pass filter.
While this feature is usually found in crossovers, I have seen it in some high-end amplifiers as well, such as AudioControl LC-4.800.
As its name suggests, a high-pass filter is a filter that only allows sound frequencies higher than a particular value to pass through it. All frequencies lower than that value will be blocked.
This feature is important because low-level frequencies can not be handled by most regular speakers. And if they’re constantly supplied with such frequencies, they can get damaged pretty quickly.
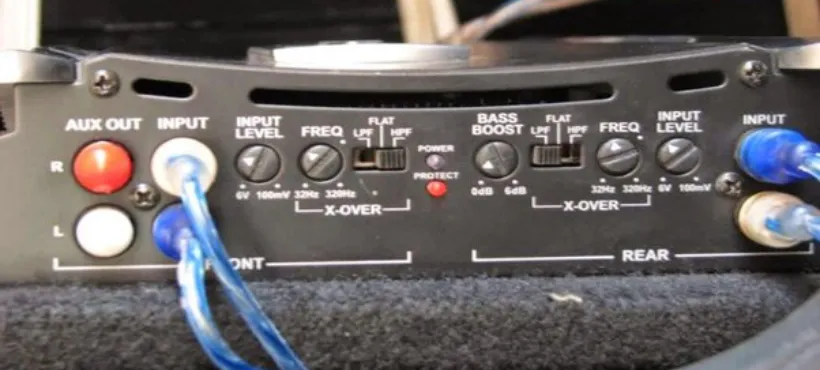
Therefore, now we’ll adjust the HPF knob on the amp to 80-200Hz (depending on your music taste) to block any bass frequency below that number.
3. How to Set Low-Pass Filter
The low-pass filter works as the exact opposite of the high-pass filter. It means it only allows frequencies lower than a particular value to the speakers.
You should adjust the LPF knob until you hear a clear vocal sound. Otherwise, you’ll get an overpowering bass into your sound.